My system, how to get one.
Questions? Email dave1 at sfwcf dot com
Last updated: September 12, 2004
There are two basic systems:
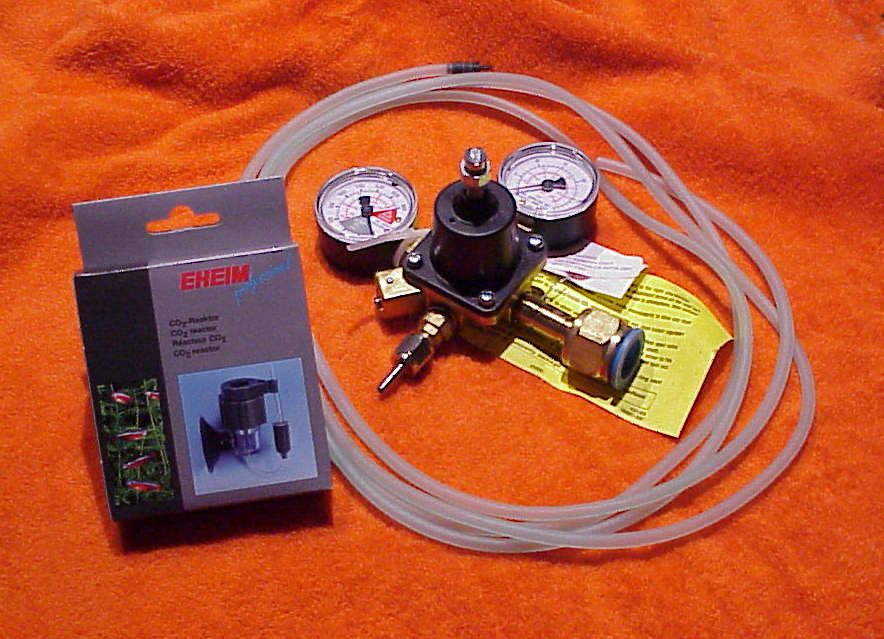
Tank->regulator->check valve->bubble counter->sintered glass diffuser
This is the simplest and cheapest. The Eheim sintered glass diffuser we sell includes a builtin check valve and bubble counter. A needle valve can be substituted for the check valve and I recommend doing this, now that you can get a good needle valve for $25.
For details, see the FAQ below
Be sure to read the section on end-of-tank.
Tank->high regulator->adaptor->low regulator->adaptor

        ->check valve->bubble counter->reactor
These systems are more expensive. I think it is hard to make them stable without spending a lot of money.
Carbon dioxide refills come generally from the same source as your tank. A refill of 20# is about $15, 5# costs a little less. You usually exchange your tank when you refill. For this reason, it is perfectly OK to start with a used tank that has been checked out for safety by the seller.
A little carbon dioxide goes a long way. One pound of carbon dioxide is about 60 gallons of gas at room temperature and pressure. That will supply most tanks for about a month. Two gallons a day is a heck of a lot of carbon dioxide.
When the critical pressure is reached, the regulator will dump the entire remaining contents of the tank into whatever comes after the regulator. When this happens, the pressure on the output side of the regulator will rise dramatically. You can try to protect your aquarium by putting a pressure relief valve set at 20 psi or so on the output side of the regulator so this excess gas will just be vented into the room that contains the cylinder. If you were dumb like I was the first time, all the gas will be pushed into your tank. If you have a glass lid on it like I did, the "air" space over the tank will be monopolized by CO2, to the exclusion of oxygen. After a few hours your fish will die of anoxia.
Replace the tank when the pressure starts to drop, just like the gauge says. There is another reason to replace the CO2 cylinder when the pressure starts to drop. Catastrophic regulator failure described above frequently damages the regulator itself, often by making a hole in the diaphragm. This damage is not covered under warranty, it is your responsibility to ensure the CO2 cylinder is replaced before regulator failure occurs.
You can tell the tank is running out in a couple of ways. First, keep an eye on the high pressure gauge. When it begins to move off the 800psi or so it had originally, it is time to replace it. Another tool is to weigh the tank. The tare (empty) weight is usually stamped into the tank near the shoulder (ask your CO2 supplier to show you). Add two pounds for the gauge and the rest is CO2. When 80% of the CO2 is gone, it is time to be careful.
Of course the best thing is just to replace the tank. But if you can't do that for a few days, one strategy is to shut off the master valve. One filling of the high pressure side of the regulator will last for several hours (see the section on leak testing). That way, if the tank starts to seriously empty the regulator will not dump the whole thing.
Or to put it another way, here is just about all I know about managing compressed CO2 (sorry for the long answer):
In an un-managed configuration, a CO2 tank after a year to ten years of faithful service will run out of gas. When this happens, the regulator which has been providing a steady outlet pressure of say 10 or 20 or 30 psi (depending on how you have it set up) will suddenly fail and dump the 2-400 psi gas straight into the appliance (reactor or whatever) that you are feeding.
The purpose of this little diatribe is to tell you all I know about avoiding this problem.
There are three basic ways to manage your CO2 system and avoid end-of-tank failure. These are anticipation of end-of-tank, relieving the pressure pulse, or avoidance of the pressure pulse. Anticipation means that you track your CO2 usage or pressure and take steps to avoid the end-of-tank condition entirely. Relief of the pressure involves a special device designed to relieve the excess pressure during the pulse so that the rise at the appliance is small. Avoidance refers to using a regulator and associated control parts so that the pulse does not occur until the tank is totally exhausted, at which time the flow will stop.
Anticipation:
Anticipation is the simplest and cheapest solution. One way to anticipate end-of-tank is to weigh the tank regularly. You can expect it to deliver about the announced volume (in pounds of CO2). If you plot weight versus tank age in days it should be easy to guess about when you will have reduced its weight by the 20 pounds of CO2 you bought. If you decide to replace it based on low weight, it would be interesting to empty it completely by opening the shutoff valve with the regulator removed to see (and weigh) how much gas actually remained.
Another way to anticipate end-of-tank is to closely monitor the high-pressure gauge on your regulator (if it has one). The pressure will START to drop weeks before an end-of-tank dump occurs.
Once an end-of-tank condition is anticipated, you can simply turn the gas off at night and when you are away until you have a chance to refill your tank.
Sadly, anticipation is unforgiving of inattention and if you don't notice the end-of-tank a disaster can occur. If your failure occurs during the day when your plants are metabolically active and producing lots of oxygen then no problem may ensue. Or if your tank is open-top, so that there is lots of atmospheric oxygen in contact with the water surface you are reasonably safe. But if your top has a tight fitting cover and the dump occurs when lights are out and your tank is heavily populated with fish, the CO2 in the gap between the water surface and the cover may physically drive off all oxygen, at which point your fish can suffocate.
Relief:
Relief is based on the idea that the excess gas that would be delivered during an end-of-tank dump is simply vented into the atmosphere somewhere. The most convenient place to vent is usually right near your tank, but you can also plumb a plastic vent line to a more convenient location if desired. A relief system should also be tested on a routine basis to make sure that it is continuing to provide the protection it was designed to give.
Pressure relief devices come in two kinds: manufactured valves and water-head homebrew devices. Many valve companies make pressure relief valves that will trigger at about 20 psi which should suit most users. If you have a higher operating pressure, make sure you select a valve that vents at a pressure just a little higher than your norm. One manufacturer of pressure relief valves is Rexarc, you can contact their sales department at (937) 839-4604 (info@rexarc.com).
You can also make a pressure relief device at home if you tap your system at a point where the pressure is supposed to be low (like right before the appliance, after any pressure-reducing check valve). At this point the pressure should be only a few feet of water (2 feet of water is about 1psi). Simply take a 6 foot piece of 3" plastic sewer pipe, put a plastic cap on one end, set it upright open end up and fill with water to about a foot from the top. Run a long piece of plastic tube or airhose down to the bottom of the sewer pipe and connect the other end to your CO2 line. As long as the pressure is less than the five feet of water in the sewer pipe, the pipe will do nothing. When the pressure rises to more than five feet of water, the excess gas will vent out thru the airhose, down to the bottom of the sewer pipe, and bubbling out the top. You can enhance this design by also capping the top and running a CO2 vent line made of plastic water pipe out to a more convenient location if you wish. Ensure the low end of the hose from the CO2 system stays at the bottom of the sewer pipe by weighing it down. Or use a rigid plastic pipe to convey the CO2 down to the bottom of the sewer pipe.
Avoidance:
A third strategy for managing end-of-tank failure is avoidance, referring to selecting system components so that failure simply does not occur. This can be an expensive strategy but should be considered if the stakes are high (such as many tanks or a very expensive setup). Avoidance strategies are like relief strategies in that they involving using different hardware.
One place to attack avoidance is at the regulator. There are two stage regulators (where one regulator feeds another, do not confuse with two gauge regulators), down-stream regulators (that regulate based on output pressure, not input pressure), and better grade regulators (that undergo much less pressure rise as the input pressure falls). All these strategies increase the cost of the system. Whether they are worth it depends on many too many factors for one person to attempt to decide for another. Generally speaking. if you are handy with tools and savvy enough to do your own CO2 system design, you should expect avoidance to add an extra $100-300 to the cost of your CO2 system.
I had considered the idea of adding a "avoidance" type system to my CO2 system line. I researched the issues carefully. Although I could buy a better grade regulator for only about $30 more than a cheaper one, the company that made it interprets ISO rules to prohibit making special versions of their products (even if it only means omitting parts that are normally added at the end). So I would have had to remove the original and build new output plumbing of the regulator myself. With the labor costs, warranty, and liability issues, this just was not practical. So I dropped the idea. If you want to pursue this idea on your own, call Praxair and ask them about a Victor SR253-B320-06 and get out your tool box.
The right way to do low pressure is to daisy-chain a carbon dioxide regulator and a natural gas regulator. But that is expensive and untried "experimental" territory. If you must have a low pressure system it is the way to go. We can help with it. Bring your wallet or charge card, though.
Whoa, that's ONE question? Here goes: The regulator serves to reduce the pressure from about 800 psi in the tank to a more manageable number. The regulator releases carbon dioxide as needed to maintain the output side pressure. If you have an Eheim diffusor (or other high pressure appliance) then the regulator can supply the needed pressure (say 15 psi) directly and stablely. This is how a "high pressure" system works. If your appliance is designed for low pressure (like a canister filter intake or a bell container or one of the bio-ball devices or ...) then you have a major problem. The regulator will not function stablely at the .2 to 1.3 psi required by these devices. You must add a second low-pressure regulator to drop the 15 psi of the first stage to a few tenths of a psi needed by your appliance. This is a very difficult and experimental setup. Many try to use a needle valve in place of the low pressure regulator. The problem is that most needle valves are not designed for the nano-flows that we use or the high pressure drops we need. A needle valve will not be useful until it reaches "sonic" conditions, which requires that the pressure drop across the needle valve be about 15-25psi (depending on valve geometry). Then the valve will start to function as a flow limiter.
A: Yes, if you are refering to the master shutoff valve on the tank. If you open it less than all the way you can get leakage around the valve.
Q: I am not sure how to turn it on! In the middle of the gauge there is a bolt. Is this supposed to have a handle/knob attached to it?
A: No, I turn mine with a coin. A knob is an invitation to little fingers. That's why many use the lock nut too.
Q: Am I supposed to turn this to open the valve?
A: Yes.
Q: How far should I turn the bolt?
A: Read the yellow slip. We sometimes run out of yellow slips and send copies instead. They are then on white paper and say "HOW TO INSTALL NEW CO2 REGULATOR ASS'Y..." at the top.
A: This is likely the result of a not-good-enough valve. If you can't find a fish store one good enough, use the $13 ARO valves and a home-made manifold (to home make a manifold, go to Home Depot and buy a length of 2" white plastic pipe and two end caps for it. Also an appropriate tap tool. For N tanks drill N+1 holes of the size recommended by the tap into the pipe (after capping the ends), thread them with the tap, then screw in the appropriate sized Eldon James adapators (you can get 9 for free as samples from their web site). If you use our Fabco NV-55 needle valves then you want to tap 10-32 threads and use a 10-32 both ends Eldon-James adapter to attach the needle valve.
Q: This sounds interesting, but I don't have the right tools, nor am I very "handy". Where do I get an needle valve? What is a manifold and why do I need one?
A: A needle valve can be obtained from me by following the link at the bottom of this page. A manifold allows you to connect several valves to one regulator. It is basically an N-way tee-type connector.
A: I am really sorry to hear that, what a bummer. You need to do more checking for leaks before leaving the main valve on the tank open for a long periord. To check for leaks, following the instructions on the yellow tag, pressurize the whole system and make the CO2 flow. Then shut off the main valve at your CO2 tank. The flow should continue for hours (based on the high-pressure volume of your valve and regulator). If it stops right away, you have a leak. Locate it with a leak detector fluid you can get from a plumbing supply (gas plumbers use it).
Q: Yeah, after I suspected the leak, I just put the whole valve underwater, and could see a stream of bubbles coming from each of the six valve controls! I went back to the store and got a new valve to try, but I can't get the cylinder refilled til Tuesday. I had the tank set at between 15 and 20 PSI. Does that sound right?
A: Yes, it usually takes about 20psi to pop the check valves open. After that, an operating pressure of 12-14 pounds is usually for a medium aquarium (say 20-50 gallons) and 13-17 for a larger tank.
A: First get rid of the leaks. You will never be happy with a leaky system. Second, turn all the valves open and increase the regulator output pressure till the first diffusor to flow starts to flow a bit too much. Then turn it down via its valve and continue to increase the pressure coming out of the regulator. As each diffusor starts to flow too much cut back its valve until all diffusors are flowing plenty. Then cut down each diffusor to its perfect level with its valve. This is called balancing the system (each valve is just balanced to its diffusor) and should not have to be done very often.
To clean algae from your disk:
1. Carefully brush the disk (remember it is fragile and brittle) with a brush (like a new toothbrush) for one minute. You can do this without disassembling the Eheim. Then check for small bubbles, if the big ones are gone you are done. Otherwise.....
2. Remove the disk from the Eheim, rinse the disk, and place it in a very small dish. Add one drop of bleach and a few drops of water. Cover.
3. After an hour or two, carefully rinse the disk. Then place it in a water glass with 2 ounces of water and enough chlorine remover to treat a gallon of water. After a few minutes rinse again. All odor of chlorine (and all chlorine) should be gone. If not, repeat this step.
This strongly oxidizing treatment should remove most all organic material, like algae.
You can achieve this by using a tee connection. To follow the description below, draw a little diagram as you read. Connect one branch to the regulator. Connect the second branch to a needle valve. Connect the third branch to a second tee. Connect the second branch of the second tee to the diffusor (reactor). Connect the third branch of the second tee to the needle valve. Put a solenoid on the line connecting the two tees directly.
When the solenoid is open, the diffusor is connected directly to the regulator and sees full regulator pressure. When the solenoid is closed, the diffusor is connected thru the needle valve and has lower, restricted flow. Either way, your system is safe.
Questions? Email dave1 at sfwcf dot com
Last updated: September 12, 2004